Looking for design inspiration? Browse our curated collections!
June 25th, 2015 - 09:49 AM

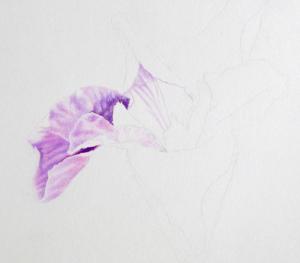
Work In Progress: Louisiana Iris, Update 2
Colored pencil painting is, by its nature, a slow process, especially if the goal is a lot of detail and density of color. Teaching a class in colored pencil painting, limited to a set number of hours, has to take these qualities into account. The Intermediate classes I will be teaching this summer and in the fall, twelve hours in length, go beyond the basics of technique to produce a painting of higher quality. However, even at twelve hours, there are limitations to the depth of detail and complexity that can be attained in a painting in the allotted time. And still have the students learn more than they would in an Introductory class.
The progression will be from lightest color to darkest color. And, I�ll be doing one petal at a time, carrying each from the beginning stage on through to completion before starting the next petal. First a layer of the lightest color, then the next darker color, then the next, and so on to the darkest color being used. Then, I�ll repeat the process again and again until I�m satisfied with the depth of color and detail on that petal or flower part. Then, I�ll go one to the next flower part. For this demonstration I�m using Strathmore 300 series Bristol Vellum. It�s a good acid free, neutral paper that serves well for demonstration purposes. The first step in the process was to apply a light layer of lavender over the leftmost petal, leaving only the brightest areas white. I kept the point sharp by frequently sharpening the pencil. Next I added hot pink to just a couple areas near the middle of the petal. Again with the lavender, I put just a bit more pressure to define the shadows, darker areas and folds in the petal.
With the lilac, the next darker color, I put in more of the darks, though at this stage, the pressure is still light because I want to build layers slowly. The lilac allows me to define more shaded areas, more folds and veining.
Mulberry is a much darker value and found only in the darkest areas � in the shadow under the over lying petal, and at the rightmost side, again in the shadows under one of the upright petals. I also added it to the ribbing on the left, near the edge of the petal. Violet, the darkest color, was next applied over the areas with mulberry.
I then repeated the sequence of colors a couple more times to add more depth and intensity, bringing out the shadows and adding definition. Finally, I looked over the petal, adding one color or another as necessary make adjustment to bring the petal into agreement with the photo.
Keep in mind that the level of detail and intensity of color must be tailored to the skill level targeted for the class. Once that level of skill is achieved, greater detail and complexity can be taught with longer and more focused classes. If students are asked to produce results that are beyond the skill level achieved up to that point, they may become frustrated and lose interest, and that would be a shame. This Intermediate level class makes use of the skills learned in an Introductory Class to achieve a finished painting with more detail and complexity, but leaves open possible further development for more advanced classes.
More of this discussion and more photos can be found on my website: richarddevinefineart.com
Comments
There are no comments on this blog. Click here to post the first comment.