Looking for design inspiration? Browse our curated collections!
June 2nd, 2015 - 03:53 PM

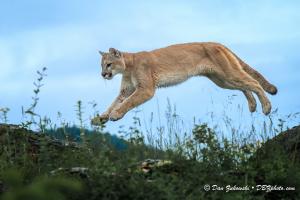
The famed street photographer Henri Cartier-Bresson spoke of the ďdecisive momentĒ when a personís action or expression is at its peak, resonating in the photograph. The most successful wildlife shots also capture this decisive moment, which often comes after many humdrum moments of hanging around watching an animal standing still.
Film photographers like Cartier-Bresson relied on instinct and experience to click the shutter at just the right time. Today, we tend to rely on high-speed continuous shooting from our digital cameras. While that helps, an understanding of the animalís behavior and concentration on their movements will ensure that you are ready for the money shot.
Telling a Story
Telling a story with wildlife photos encompasses a variety of visual approaches. The ďdecisive momentĒ usually involves action, which means the super-telephoto canít be fully zoomed or youíll risk losing the animal off-frame. However, when the subject is close enough and the lens long enough, tight shots of the head create very powerful pictures. I also like to show the animal in its environment, requiring a wider focal length. Verticals also add variety to the images.
You donít always have to be on a tripod and your tripod doesnít always have to be at full height. Ideally, you want to be at eye level with the animal, and that often means getting low to the ground. You can go handheld or bring your tripod all the way down.
I like to shoot wildlife with a Canon EOS 5D Mk III or 1DX. I have recently been using the new Tamron SP 150-600MM F/5-6.3 Di VC USD lens. Itís incredibly sharp and light weight, and a great value. Another favorite is the Canon EF100-400mm lens. If the animals are large enough and close enough, a shorter lens will do the job.
Technical Success
The key to technical success is using a shutter speed high enough to freeze the animalís movement (unless youíre going for an artistic pan or blur effect) and an aperture small enough for the depth-of-field needed. For medium to larger animals, Iíll start with 1/640 second and f/8. You may need to go to f/11 if there is a group of animals that you want to have in focus. Birds in flight may require a faster shutter speed.
Since todayís image sensors handle higher ISOís better, one approach is to use the Manual setting on your dial, set the shutter speed and aperture, and set the ISO to auto. If the light is constant (open sky, clould cover or sunshine), Iíll often make a couple of test shots and then set all three manually. Then, unless the light changes, I no longer have to worry about exposure. Alternately, I suggest using shutter priority, as more shots will be ruined with a low shutter speed than anything else.
Focus on the eyes: they are the most critical part of the photograph. Be sure to lock focus and then reframe the image to give yourself a dramatic composition.
Always stay safe and be aware of your surroundings when shooting in the wild. And you donít have to head to the jungle or the Arctic; just go to your local zoo or wild animal park. They are great places to enjoy your wildlife photography.
Comments
There are no comments on this blog. Click here to post the first comment.