Looking for design inspiration? Browse our curated collections!
November 24th, 2015 - 03:59 AM

Let’s come back to photo stitching technique…
In my previous post, I was introducing the main benefits coming with this technique. I will now introduce the main parameters you need to consider when shooting.
Tripod or not tripod ? That is the question…
The good news is… that you don’t always need a tripod (like in my example). So you can start testing this technique with your DSLR camera only… It also works with compact cameras ! Of course there are (a lot) of scenarios for which having a tripod and a specific pano head will be mandatory !
Horizontal or vertical shooting ?
Most of the time, I would recommend shooting in vertical mode. Go back to my example… with 5 to 7 pictures, the result image comes with a reasonable ratio (2:1). Using horizontal mode, the result would have been a picture with an outstanding ratio, 4:1 or 5:1 (or more) which is not always very nice. However, if you plan to go for a vertical pano, then, you can think about horizontal shooting !
Overlapping :
If you want to facilitate stitching process done by the software, you will have to think about 20-30% overlap between each picture. The smaller your focal length is, the higher the overlap ratio should be…
Focal length… which one ?
It’s up to you ! The higher focal length is, the higher number of shots you’ll need in order to capture the scene… and the higher the result image resolution will be !
If you’re new with this technique, you can start shooting 3 to 5 images in order to get the favour of it.
My example shows one row of 5 pictures, depending on focal length, I may have to shoot multiple rows of multiple shots…
Nodal Point… what’s that ?
To keep it simple, let’s see that as the ideal point around which the camera shoot rotate in order to avoid parallax issue between pictures. This parallax may quickly become a big issue if you have a very close foreground. This is the kind of situation where you will need a tripod and a pano head… If you don’t have a close foreground, then you may skip the tripod as parallax issue will become less important.
Having said that, you already have good chance to get a pretty good results… Let’s go deeper…
Shooting parameters :
Ideally speaking, here are additional recommendations you should follow :
- Do the focus once. Don’t change focus between each shot
- Don’t change focal length. Keep the same for all shots
- Shoot in RAW mode when possible. This will facilitate white balance management
- Automatic white balance is fine. For very complex and large panos, you may have to set same value for all shots before processing in order to facilitate color management within the software. This can be done in batch mode
Top of the top… shoot in manual mode !
That’s probably the most difficult piece as you may capture a very large scene having large dynamic constraints from dark to bright areas… You need to determine the best exposure for the entire scene, then manually fix aperture and speed values.
You’ll understand pretty quickly why I’m also combining photo stitching technique with HDR one !
Back to your computer…
There are a lot of stitching software, I let you Google search. One of the well-known one is Kolor Autopano Giga that I’ve being using for couple of years now.
Ouch… that was a long story !
I hope I wasn’t too technical !
Feel free to comment if you have questions or additional points you would like me to clarify.
Cheers
Comments


Patrick Jacquet
8 Years Ago
St Genis Pouilly, Ain
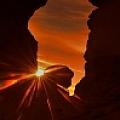
Vertigo... from my "360 visions" collection... 69 stitched pictures