Looking for design inspiration? Browse our curated collections!
April 4th, 2015 - 12:49 PM

Macro photography is always seen as a bit of specialist subject, there’s lots of different techniques to get the level of magnification needed, from expensive dedicated lenses like the Canon MP-E 65mm, to reverse lens adapters, extension tubes, bellows… it’s a confusing market and can seem daunting to get started.
There’s also a lot of challenges, finding your subject and getting close enough, shallow depth of field, getting enough light in. No matter what equipment you use you will come across these problems.
The attraction for me was being able to see things that aren’t visible to the naked eye, being able to show someone a view of an insect that they wouldn’t otherwise see is pretty cool and it almost transports you to life in a different scale.
I tried a few different techniques, always on a very tight budget and with limited success. They’re all worth experimenting with, you may get better results than me and it’s a good way to learn a bit about lenses and optics.
Close-Up Filters – Basically magnifying glasses for your lens, they come in different strengths and you can stack them for a stronger effect. It’s a good introduction but I never quite got the level of macro I was after, you might have better results with a different lens and they can be picked up relatively cheap.
Reversing Ring – This is an adapter that is a lens fitting on one side and a filter thread on the other, so you attach it to your camera body, then screw a lens backwards on to that. Generally best with prime lenses like a 50mm but you lose all electrical contact with the lens, so you will really struggle here if your lens doesn’t have an aperture ring. There’s a good guide on that here http://digital-photography-school.com/reverse-lens-macro-close-up-photography-lesson-3/
Extension Tubes – These go between your camera body and lens to move the lens further from the sensor which increases the magnification, again they usually come in sets of different sizes which can be stacked. I went cheap here and picked up ones with no electronics which makes things difficult, but again it didn’t really give the results I was after so I’m glad I didn’t spend a lot. With manual tubes you lose aperture control again, if you don’t have an aperture ring you can cheat by setting a suitable aperture while the lens is on your camera normally, then hold down the DoF preview button while removing the lens. Expensive automatic extension tubes will pass all the electronics through to your lens like usual.
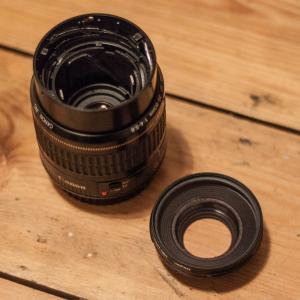
Having tried all these I happened upon a forum post about modifying a cheap Canon 35-80mm lens for macro, I checked out eBay and found one for £25 so bought it and gave it a go. Put simply you remove the front element, which was just 3 small screws around the front edge of the lens on the USM version I used.
I then wrapped the front element in a cloth and hit it with a hammer to remove the glass, using a sharp knife to tidy the edges up afterwards (disclaimer – if you do this use suitable safety equipment!). I could then refit this section and screw on a filter to stop dust getting inside the lens.
This has been the lens I have used for all macro photography since, with some pretty good results.
The only way to focus is to move forwards and backwards to meet the fixed focal plane, which is only a couple of centimetres from the end of the lens depending on your zoom level.
True macro should be a life size image of the subject on your camera’s sensor, a 1:1 ratio or greater, a lot of lenses claiming to be macro only actually achieve magnifications like 1:2. My Canon 500D sensor is 22.3mm across, so the way to check the ratio is to photograph a ruler as close as possible and divide 22.3 by the measurement.
An uncropped view of what the modified lens can focus on at the 80mm zoom setting shows 13mm of the ruler is captured by the lens, so the magnification is 1.72x or 1.72:1 – definitely a true macro!
So if you’re interested in macro on a budget give this a go and let me know how you get on, I’d love to see more photos people have taken with it.
Please click through to the link below to view the original article with photographs.
Comments
There are no comments on this blog. Click here to post the first comment.